In noisy conditions on the airwaves, it can be hard to exchange information effectively. Rather than throwing more power or another $1000 of equipment at the problem, radio operators can often improve reception by adjusting the signal at its source: their articulatory organs. By enunciating, focusing on vowels, using recognized phonetic alphabets, and matching listeners’ expectations about pitch, amateur radio operators can effectively boost the quality of their signal.
Since the 1960s and 1970s, public interest in amateur radio has waned as reliable mobile communication has become available for minimal cost. Our dependence on such systems, however, has left us increasingly vulnerable to natural and man-made disasters. When the communication infrastructure is destroyed or severely overloaded (such as the 2011 Japanese earthquake and tsunami, Hurricane Katrina, the Marine Corps Marathon, and presidential inaugurations), hams continue to provide robust, decentralized communication.
Beyond practical uses, ham radio is also a hobby like any other, worthwhile for the enjoyment it brings.
“Noise” on the Air
The amateur radio bands do not always provide a perfect channel for communication. In especially bad conditions, trying to understand a message can be akin to listening to shouting from half a block away, on a windy day with city traffic. Although some atmospheric and noise conditions are uncontrollable, amateur radio operators do our best to produce cleanly intelligible signals, and we hone the skills required to understand content despite bad conditions.
The spread of points in one dimension is easy to calculate and to visualize, but the spread of points in two (or more) dimensions is less simple. Instead of familiar error bars, standard deviational ellipses (SDEs) represent the standard deviation along both axes simultaneously. The result is similar to a contour line that traces the edge of one standard deviation, as on a topographic map or an isochore map. The calculation of a standard deviational ellipse can be tricky, because the axes along which the ellipse falls may be rotated from the original source axes.
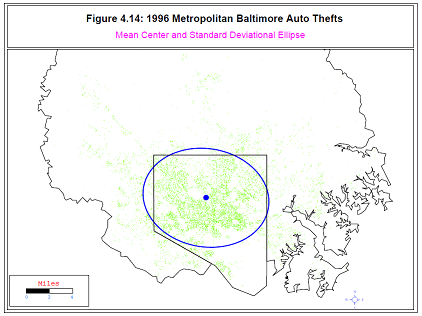
The standard deviational ellipse algorithm is described here and here, and it was implemented in aspace, an R library for geographic visualization work developed by Randy Bui, Ron N. Buliung, and Tarmo K. Remmel. The SDEs are calculated by calc_sde and are visualized by plot_sde. (The people who are most interested in multi-dimensional standard deviations seem to be geographers visualizing point data; an example of visualizing auto theft in Baltimore appears at right.)
The aspace SDE implementation is a very useful implementation. I’m going to talk about implementing three extensions to it:
Giving better example code for how to use the package.
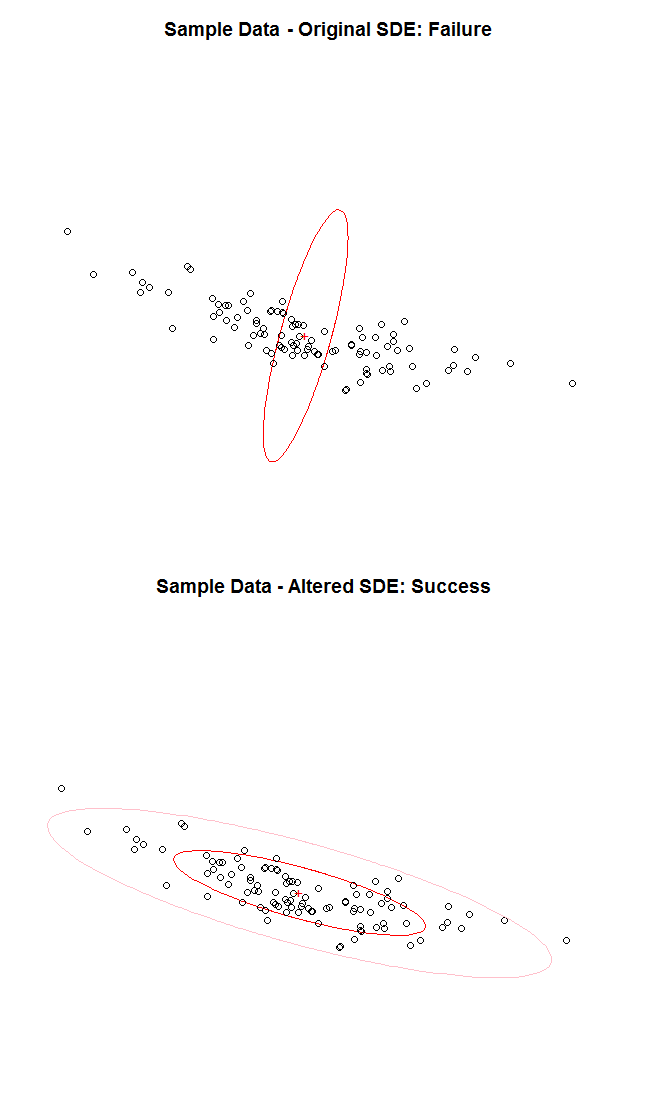
Fixing a bug in which the ellipse is often incorrectly rotated by 90 degrees. [This has been fixed by the authors in aspace 3.2, following contact from me.]
Adding a feature that shows more than one standard deviations.
This post addresses each in turn.
More Thorough Example Usage Code for aspace::plot_sde
plot_sde doesn’t take the result of calc_sde as a parameter, and its documentation doesn’t indicate how R knows which SDE to draw. To draw an SDE, run plot_sde immediately after calc_sde. R uses an implicit object hidden from the user to pass data. A better usage example is:
# Example aspace::calc_sde and aspace::plot_sde Codelibrary(aspace)
# Create the data and rotate itx =rnorm(100, mean =10, sd=2)
y =rnorm(100, mean =10, sd=4)
t =-pi/4# Illustrates normal case (rotated to right from vertical)#t = pi/4 # Illustrates the bug described below (rotated to left from vertical)transmat =matrix(c(cos(t),-sin(t),sin(t),cos(t)),nrow=2,byrow=TRUE)
pts =t(transmat %*%t(cbind(x,y)))
# Create the plot but don't show the markersplot(pts, xlab="", ylab="", asp=1, axes=FALSE, main="Sample Data", type="n")
# Calculate and plot the first standard deviational ellipse on the existing plotcalc_sde(id=1,points=pts);
plot_sde(plotnew=FALSE, plotcentre=FALSE, centre.col="red",
centre.pch="1", sde.col="red",sde.lwd=1,titletxt="",
plotpoints=TRUE,points.col="black")
# Label the centroid, explicitly using the hidden r.SDE object that was used in plot_sdetext(r.SDE$CENTRE.x, r.SDE$CENTRE.y, "+", col="red")
The above code will plot the data without axes, layering the SDE ellipse on top of a plot that does not display data markers (as illustrated at below right).
Correct Visualization Regardless of Major Axis
14 August 2012: This has been fixed by the authors in aspace 3.2 following contact from me.
The aspace 3.0 calc_sde code (accessible by typing the function name without parentheses at the R prompt) includes the lines:
This code seems to aim to ensure that theta is a positive number — but the first line doesn’t ensure that. Instead it causes negative rotations to end up at 90 degrees to where they should be (as in the illustration at right). Instead that first if-clause could be:
This code is one of multiple options that fixes the off-by-90-degrees issue.
Display of Multiple Standard Deviations
The aspace 3.0 calc_sde code only will only trace an ellipse of one standard deviation in each direction. To change this, add a multiplicative factor to sigmax and sigmay immediately before (or immediately after) the following lines:
if (sigmax > sigmay) {
Major <-"SigmaX" Minor <-"SigmaY"}
else {
Major <-"SigmaY" Minor <-"SigmaX"}
For instance, to calculate (and therefore plot) two standard deviations around the centroid, add in the lines:
sigmax=sigmax*2sigmay=sigmay*2
These lines double the length of the single-standard-deviation major and minor axes.
As discussed in Exporting standalone batch runs, Christof Zellweger developed a .sh file for Repast that will run in “batch mode” on non-development Mac and *nix machines. That file and his comments appear below. (I’ve also posted a sample .bat file and a sample .command file, both contributed by others. You may get some benefit from looking at those as well.)
start_model.command, modified by Christof Zellweger in 2012 to use BatchMain
#!/bin/bash
# The version of Repast Simphony being used.exportVERSION=2.0.0
# The installed path of Repast. Quotes may be necessary if there is a space character in the path.exportREPAST="/path/to/your/repast/home/folder"# The installed path of Eclipse. Quotes may be necessary if there is a space character in the path.exportECLIPSE=$REPAST/eclipse
# The plugins path of Eclipse.exportPLUGINS=$ECLIPSE/plugins
exportREPAST_SIMPHONY_LIB=$PLUGINS/repast.simphony.runtime_$VERSION/lib
# The Eclipse workspace containing the Repast model.exportWORKSPACE=/path/to/your/workspace/
# The name of the model. This might be case-sensitive. This is the name of your package. It should # be the package at the top of all your .java files and match the "package" listed in your # model.score file (when viewed as a text file).exportMODELNAME=# The folder of the model. This might be case-sensitive. This is the base folder of your # project in the file system.exportMODELFOLDER=$WORKSPACE/
# The file containing the batch parameters. For some additional information, see Repast # documentation of batch parameters at http://repast.sourceforge.net/docs/reference/SIM/Batch%20Parameters.html# and/or an example batch_params.xml file at # http://www.pamelatoman.net/blog/2010/08/sample-batchparamsxml/.# The following is the usual location within your Repast workspace - change according to your location / systemexportBATCHPARAMS=$MODELFOLDER/batch/batch_params.xml
# Change to the root folder of your project so that the relative paths are handled correctlycd$MODELFOLDER# Execute in batch mode.java -classpath $MODELFOLDER/lib/*:$MODELFOLDER/bin:$PLUGINS/repast.simphony.scenario_$VERSION/bin:
$PLUGINS/repast.simphony.batch_$VERSION/bin:$PLUGINS/repast.simphony.runtime_$VERSION/lib/*:
$PLUGINS/repast.simphony.runtime_$VERSION/bin:$PLUGINS/repast.simphony.core_$VERSION/lib/*:
$PLUGINS/repast.simphony.core_$VERSION/bin:$PLUGINS/repast.simphony.data_$VERSION/lib/*:
$PLUGINS/repast.simphony.score.runtime_$VERSION/lib/*:$PLUGINS/repast.simphony.score.runtime_$VERSION/bin:
$PLUGINS/repast.simphony.dataLoader_$VERSION/bin:$PLUGINS/repast.simphony.data_$VERSION/bin:
$PLUGINS/repast.simphony.score_$VERSION/bin:$REPAST_SIMPHONY_LIB/saf.core.runtime.jar:
$REPAST_SIMPHONY_LIB/commons-logging-1.0.4.jar:$REPAST_SIMPHONY_LIB/groovy-all-1.5.7.jar:
$REPAST_SIMPHONY_LIB/javassist-3.7.0.GA.jar:$REPAST_SIMPHONY_LIB/jpf.jar:$REPAST_SIMPHONY_LIB/jpf-boot.jar:
$REPAST_SIMPHONY_LIB/log4j-1.2.13.jar:$REPAST_SIMPHONY_LIB/xpp3_min-1.1.4c.jar:
$REPAST_SIMPHONY_LIB/xstream-1.3.jar repast.simphony.batch.BatchMain -params $BATCHPARAMS$MODELFOLDER/$MODELNAME.rs
Christof Zellweger writes:
I’ve tested this on Mac OS X Snow Leopard 10.6.8. I didn’t have a Linux box available but seeing that OS X uses a XNU (Unix Mach/BSD hybrid) kernel, I would assume that this script runs on many *NIX platforms unchanged and if not, only small changes would be necessary.
The main difference in this script (apart from usage of the *NIX ‘export’ equivalent to Window’s ‘set’ command) was that I’ve added 2-3 search locations/directories in the classpath argument. Plus I’ve added a few comments.
As discussed in Exporting standalone batch runs, Stefan König and Axel Pürkhauer developed a .command file for Repast that will run in “batch mode” on non-development Mac and *nix machines. That file appears below. (I’ve also posted a sample .bat file and a sample .sh file, both contributed by others. You may get some benefit from looking at those as well.)
start_model.command, modified by Stefan König and Axel Pürkhauer in 2010 to use BatchMain
#!/bin/bash
# Repast Simphony Model Starter# By Michael J. North and Jonathan Ozik# 11/12/2007# Edited by Stefan König for use with batch files# Note the Repast Simphony Directories.PWD="${0%/*}"cd$PWDREPAST_VERSION=1.2.0
REPAST_BASE=$PWD/repast.simphony
REPAST_SIMPHONY_ROOT=$REPAST_BASE/repast.simphony.runtime_$REPAST_VERSIONREPAST_SIMPHONY_LIB=$REPAST_SIMPHONY_ROOT/lib
# Define the Core Repast Simphony Directories and JARsCP=$CP:$REPAST_BASE/repast.simphony.batch_$REPAST_VERSION/bin
CP=$CP:$REPAST_BASE/repast.simphony.runtime_$REPAST_VERSION/lib/*
CP=$CP:$REPAST_BASE/repast.simphony.core_$REPAST_VERSION/lib/*
CP=$CP:$REPAST_BASE/repast.simphony.core_$REPAST_VERSION/bin
CP=$CP:$REPAST_SIMPHONY_ROOT/bin
CP=$CP:$REPAST_SIMPHONY_ROOT/bin-groovy
CP=$CP:$REPAST_BASE/repast.simphony.score.runtime_$REPAST_VERSION/lib/*
CP=$CP:$REPAST_BASE/repast.simphony.score.runtime_$REPAST_VERSION/bin
CP=$CP:$REPAST_BASE/repast.simphony.dataLoader_$REPAST_VERSION/bin
CP=$CP:$REPAST_BASE/repast.simphony.data_$REPAST_VERSION/bin
CP=$CP:$REPAST_BASE/repast.simphony.score_$REPAST_VERSION/bin
CP=$CP:$PWD/yourModelDirectory/bin #### NOTE: yourModelDirectoryCP=$CP:$REPAST_SIMPHONY_LIB/saf.core.runtime.jar
CP=$CP:$REPAST_SIMPHONY_LIB/commons-logging-1.0.4.jar
CP=$CP:$REPAST_SIMPHONY_LIB/groovy-all-1.5.7.jar
CP=$CP:$REPAST_SIMPHONY_LIB/javassist-3.7.0.GA.jar
CP=$CP:$REPAST_SIMPHONY_LIB/jpf.jar
CP=$CP:$REPAST_SIMPHONY_LIB/jpf-boot.jar
CP=$CP:$REPAST_SIMPHONY_LIB/log4j-1.2.13.jar
CP=$CP:$REPAST_SIMPHONY_LIB/xpp3_min-1.1.4c.jar
CP=$CP:$REPAST_SIMPHONY_LIB/xstream-1.3.jar
CP=$CP:$REPAST_BASE/repast.simphony.data_$REPAST_VERSION/lib/*
# Change to the Default Repast Simphony Directorycd yourModelDirectory #### NOTE: yourModelDirectory# Start the Model/path/to/bin/java -Xss10M -Xmx400M -cp $CP repast.simphony.batch.BatchMain -params $PWD/batch/params.xml yourModel .rs
As discussed in Exporting standalone batch runs, I developed a .bat file for Repast that will run in “batch mode” on non-development Windows machines. That file appears below. (I’ve also posted a sample .sh file and a sample .command file, both contributed by others. You may get some benefit from looking at those as well.)
start_model.bat, modified by Pamela Toman in 2010 to use BatchMain
@ECHO OFF
TITLE yourModelNameHere
REM Repast Simphony Batch Run Model StarterREM By Michael J. North and Jonathan Ozik,REM edited for batch runs by Pamela Toman,REM on basis of .command file from Stefan KönigREMREM Please note that the paths given below useREM a unusual Linux-like notation. This is aREM unfortunate requirement of the Java PluginREM framework application loader.REM fill out the below information so it is true for your installationsetREPAST_VERSION=1.2.0
setREPAST_SIMPHONY=../repast.simphony
setREPAST_SIMPHONY_ROOT=%REPAST_SIMPHONY%/repast.simphony.runtime_1.2.0
setREPAST_SIMPHONY_LIB=%REPAST_SIMPHONY_ROOT%/lib
REM Define the Core Repast Simphony Directories and JARsREM You may not need the line below. I had to reset the classpath (as in the next line)REM to avoid the character length limit on classpaths (I was getting an "input line is tooREM long" error upon running this file).setCP=
SETCP=%CP%;%REPAST_SIMPHONY%/repast.simphony.batch_%REPAST_VERSION%/bin
SETCP=%CP%;%REPAST_SIMPHONY%/repast.simphony.runtime_%REPAST_VERSION%/lib/*
SETCP=%CP%;%REPAST_SIMPHONY%/repast.simphony.core_%REPAST_VERSION%/lib/*
SETCP=%CP%;%REPAST_SIMPHONY%/repast.simphony.core_%REPAST_VERSION%/bin
SETCP=%CP%;%REPAST_SIMPHONY_ROOT%/bin/
SETCP=%CP%;%REPAST_SIMPHONY_ROOT%/bin-groovy
SETCP=%CP%;%REPAST_SIMPHONY%/repast.simphony.score.runtime_%REPAST_VERSION%/lib/*
SETCP=%CP%;%REPAST_SIMPHONY%/repast.simphony.score.runtime_%REPAST_VERSION%/bin
SETCP=%CP%;%REPAST_SIMPHONY%/repast.simphony.dataLoader_%REPAST_VERSION%/bin
SETCP=%CP%;%REPAST_SIMPHONY%/repast.simphony.data_%REPAST_VERSION%/bin
SETCP=%CP%;%REPAST_SIMPHONY%/repast.simphony.score_%REPAST_VERSION%/bin
SETCP=%CP%;%REPAST_SIMPHONY_LIB%/saf.core.runtime.jar
SETCP=%CP%;%REPAST_SIMPHONY_LIB%/commons-logging-1.0.4.jar
SETCP=%CP%;%REPAST_SIMPHONY_LIB%/groovy-all-1.5.7.jar
SETCP=%CP%;%REPAST_SIMPHONY_LIB%/javassist-3.7.0.GA.jar
SETCP=%CP%;%REPAST_SIMPHONY_LIB%/jpf.jar
SETCP=%CP%;%REPAST_SIMPHONY_LIB%/jpf-boot.jar
SETCP=%CP%;%REPAST_SIMPHONY_LIB%/log4j-1.2.13.jar
SETCP=%CP%;%REPAST_SIMPHONY_LIB%/xpp3_min-1.1.4c.jar
SETCP=%CP%;%REPAST_SIMPHONY_LIB%/xstream-1.3.jar
SETCP=%CP%;%REPAST_SIMPHONY%/repast.simphony.data_%REPAST_VERSION%/lib/*
SETCP=%CP%;./bin
REM adding the bin to the classpath (above) is important!REM Change to the Default Repast Simphony Directorycd yourModelDirectory
REM directory change is needed so that local links don't break when running theREM program -- e.g. when pulling in data from a folderREM Start the Model. In the batch version you must include the path toREM the batch file parameters in addition to the XXX.rs folder containing the model.score file.java -Xss10M -Xmx400M -cp %CP% repast.simphony.batch.BatchMain -params batch/batch_params.xml yourModel.rs
REM move back up a level, to where you startedcd ..
Whatever is on my mind. The content has varied over the past more-than-decade, but it's always been technical. In the early years I focused on improving the fabric of the internet for some niche tools. But the internet no longer needs that kind of improving, and search doesn't really work like that anymore either. This blog is currently mostly about documenting notes for my future self, and sharing those notes with anyone who is interested.